I recently shot a few photographs for a client. It was pretty similar to previous shoots I've done, but there was one big difference: editing was de rigeur. I'm not merely talking about removing hotspots, but serious stuff...like removing entire shadow bars.
This, ladies and gentlemen, required me to walk by faith. ;-)
When I was asked if I could remove that shadow bar, I responded in the affirmative, thinking that there must have been other Photoshop Elements 4 (PE4) features that I didn't fully explore yet. Thankfully, I was right; as of Tuesday evening, I have a few more weapons in my arsenal: the healing brush (similar to the spot healing brush), clone stamp, blur and smudge tools. Through pure initiative, tenacity and trial and error (plenty of error, I might add), I've not only removed that shadow bar, but I've also managed to remove hotspots which were too complex for the spot healing brush to handle.
I spent a few late nights and early mornings getting my edits just right, but as I looked at them with brand new eyes* (i.e. non-fatigued eyes) this morning, I was quite pleased with my results. When I show my work to my client later, I hope he'll also be pleased.
Other than the minor task of finishing two corners, my work is done.
*That's a Paramore reference. Yes, I'm a fan.
*EDIT at 12:45 p.m.* I forgot to mention...there's a reason why I can't show you the results. ;-)
Showing posts with label Processing. Show all posts
Showing posts with label Processing. Show all posts
December 02, 2009
November 20, 2009
Fun With The Spot Healing Brush
Before I took my photography habit more seriously, I solely used Photoshop Elements 4.0 (PE4) to resize and crop images. Nowadays, I also subtly tweak the lighting if necessary. As of last night, however, I've added another weapon to my arsenal.
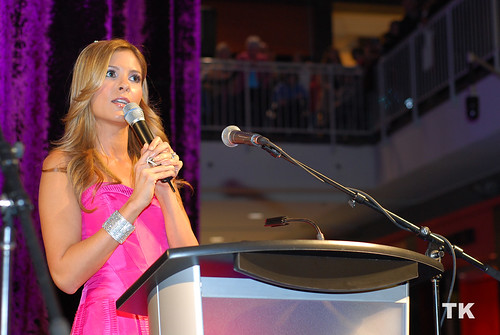
PE4 has a spot healing brush which I've never used until recently; professional photo editors probably use it to hide skin blemishes and spots. I've also found that it's helpful in covering up minor hotspots in flash photography. For instance, I used it in this shot from last night's art reception at Median Contemporary.
I left a few hotspots because I didn't want to overdo it, but I got rid of the worst ones.
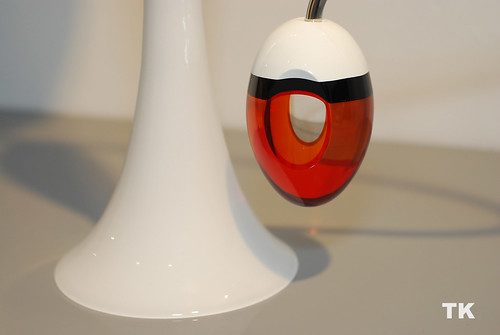
There are bound to be a few people who think that I'm making this up, so I'm going to demonstrate my process using one of the photos from the Swarovski Crystal Wish Tree ceremony. Take note of the hotspot near the upper-left corner of the image below.
Here's a close-up of the hotspot in question at 100%.
Using the spot healing brush tool, I pick a brush size which is just large enough to cover the hotspot (but not too large). I also make sure that "proximity match" is selected before I make my fix.
Here's how this close-up looks after the process.

It may not be obvious where the hotspot originally was, so here's the same photo with the location circled.

At this resolution, perhaps a trained eye can see what I did, even without the circle. Of course, the best way to avoid flash hotspots is by not using a flash. ;-)
PE4 has a spot healing brush which I've never used until recently; professional photo editors probably use it to hide skin blemishes and spots. I've also found that it's helpful in covering up minor hotspots in flash photography. For instance, I used it in this shot from last night's art reception at Median Contemporary.
I left a few hotspots because I didn't want to overdo it, but I got rid of the worst ones.
There are bound to be a few people who think that I'm making this up, so I'm going to demonstrate my process using one of the photos from the Swarovski Crystal Wish Tree ceremony. Take note of the hotspot near the upper-left corner of the image below.
Here's a close-up of the hotspot in question at 100%.

Using the spot healing brush tool, I pick a brush size which is just large enough to cover the hotspot (but not too large). I also make sure that "proximity match" is selected before I make my fix.
Here's how this close-up looks after the process.

It may not be obvious where the hotspot originally was, so here's the same photo with the location circled.

At this resolution, perhaps a trained eye can see what I did, even without the circle. Of course, the best way to avoid flash hotspots is by not using a flash. ;-)
August 28, 2009
The Things We Do For Love
As I said previously, I took a lot of photos while attending BuskerFest yesterday. Even after judiciously deleting and cropping photos where necessary (and believe me, it was necessary), I still ended up with 409 megs worth of high-resolution photographs. Imagine how long it would take to upload them to my Flickr account all at once!
Even with that, I foolishly tried that earlier this morning, but after discovering that I indeed valued sleep, I cancelled the upload. Thankfully, after I woke up, I uploaded the rest of the photos in different stages.
I tried something different in my shoot yesterday: instead of taking small-sized photos (1936 by 1296 pixels), I took medium-sized ones (2896 by 1944 pixels). My thinking was this: if I didn't get the best view (or even if I did), my 18-55 mm lens might not have been able to capture the action in its entire frame. Since I'd probably need to crop photos when I got home, I didn't want to sacrifice resolution or quality.
I'm ultimately glad that I went this route, but man - there's a lot of (worthwhile) work involved!
August 27, 2009
300!
Lately, I've been blogging about how my new camera shoots images with 300 ppi (pixels per inch, a.k.a. dots per inch). However, the truth is that I almost missed this fact.
When I was regularly taking photos with my point-and-shoot, I took it for granted that each image had 72 ppi. This was in part due to my former post-production process; I'd process all of the photos from a shoot via the "Process Multiple Files" option in Photoshop Elements (i.e. resize, sharpen, convert to JPEG max quality). If I was only processing one photo, I'd do these steps individually.
The other day when I took "practice" shots with my DSLR, I was messing around with them in Elements.* I think I was about to resize them when I noticed the extra ppi I gained just by using a different camera.
I was elated, but this boost would have been worth nothing if I didn't stumble upon one fact - when I was processing multiple files, the ppi was set to 72. Ergo, when processing my DSLR's photos, I'd have to set it to 300 to prevent any loss of pixels. Of course, point-and-shoot processing won't change; I'll just need to be extra cognizant about the ppi setting.
*I shortened "Photoshop Elements" to "Elements" so I wouldn't have to keep writing the first term over and over again.
August 20, 2009
Joy And Pain
Yesterday evening was supposed to be one my better ones. After having spent the day taking photographs at Toronto Botanical Garden & Edwards Gardens, I was looking forward to making my Flickr debut with photos which I thought were more than just up to snuff.
Before I upload photos, I usually make any necessary edits in Adobe Photoshop Elements (a scaled-down version of Photoshop). This usually means resizing, rotating and applying a bit of Smart Fix if necessary. I don't like doing the last thing too much; I try my hardest to get the settings correct when I actually take the photograph (i.e. white balance, exposure, etc...).
My usual process involves using the "Process Multiple Files" feature in order to sharpen and resize my photos in one shot. I also convert each file to JPEG Max Quality while using that feature. Yesterday, however, I did things a bit differently in light of my Flickr debut - I sharpened the photos and then resized them. I was planning to keep the high-resolution photos for the Flickr upload, but after sharpening them, I nixed that idea.
I decided that I'd upload the resized photos to Flickr, so using the "Process Multiple Files" feature, I resized the photos. What I didn't do this time around was check the "Convert Files To JPEG Max Quality" box; since I already did this during the sharpening, I thought that doing so again would have been redundant.
This seemed like a good idea at the time.
I looked at one of my photos - specifically, this one.

Look at the letters in "Toronto Botanical Garden"; there is obvious evidence of compression which I'm not used to seeing in my images. When I saw that last night, I lost it. I even came very close to deleting this batch of photos since, in my opinion, they weren't up to my usual standards. If it wasn't for the fact that a program was using them, I may have went through with that deletion and put myself in more misery.
As you should already know, I ended up uploading the compressed photographs. Despite their subpar standards, I still think I got some good shots yesterday. Sometimes, perfect is the enemy of the good; it almost became my enemy yesterday night.
Subscribe to:
Posts (Atom)