Showing posts with label Technique. Show all posts

May 31, 2010

Squeeze It To Please It

One of my photos from Doors Open 2010 has an interesting story behind its conception, which started shortly after I took this photo at the Ontario Heritage Centre.

Doors Open Toronto 2010 #48

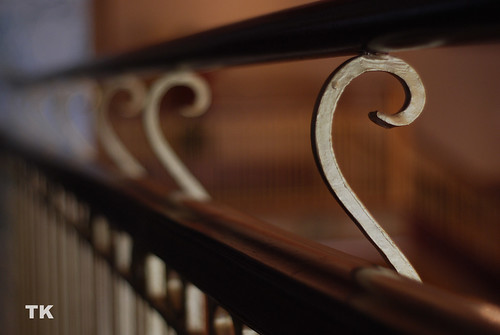
Take note of the “bass clef,” which is really an “S” or, if you will, two joined clefs. My idea was to take a photo where you’d be looking through the top curls of the clefs, resulting in quite a visual effect. However, due to the tight space between the railings, obtaining this shot would not be a cakewalk. I decided that I would at least rise to this challenge – even if it meant wasting time, effort, photos and battery power.

I began by removing the flash from my D60 and sliding the camera in its landscape orientation between the railings, holding it at its bottom-left corner with my left hand in order to stabilize it. For additional support, I held its right side with my right hand and put its uncovered hot shoe’s guides against the bottom of the top railing. Next, I attempted to optimally position the camera using my hands and my naked eye. I even tried to squeeze my head between the railings in order to improve this positioning by looking through the viewfinder. Unfortunately, this was a futile denial of an indisputable fact: my difficulty would be compounded by my camera’s lack of a live view function.

I took many photographs and used their results to assist me in achieving optimal composition, focus, aperture, shutter speed and ISO. At one point, I even switched to portrait orientation and restarted my process. After about fifty to sixty failed attempts, I finally came as close to my initial idea as I thought possible.

Doors Open Toronto 2010 #49

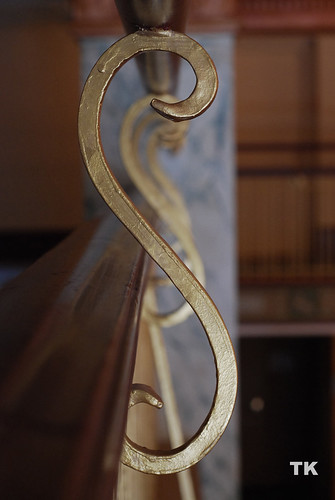
Considering the many hoops I jumped through, I think this is a pretty good photograph. (I took a similar picture in landscape orientation, but I eventually deleted it.)

A brief word about this photo’s shutter speed is in order. Without my tripod, I don’t usually use speeds slower than 1/60 (i.e. 1/60th of a second), although I’ve taken a few good photos at 1/40. You’d probably think that using slower speeds would automatically lead to unusable photos. However, thanks to the railings and my stabilizing setup, 1/15 ended up being just the speed that I needed to complete this task.

May 25, 2010

Kitty's Revenge

Ever since buying my first prime lens (Nifty), my kit zoom lens (Kitty) has been relegated to the sidelines. There’s something to be said for zooming with your feet; it’s a valuable learning experience. However, as I mentally planned yesterday’s fireworks shoot, it occurred to me that using my primes would have been restrictive. Two factors would have prevented easy movement: being surrounded by other people and using my tripod (Legs), which is not as easy to swivel as my head. Also, considering the fact that my tripod allows for long exposures, the need for the widest apertures of fast prime lenses is lessened significantly.

Mind you, I did use my 35mm prime (Jane) to take photographs before the fireworks started. However, after setting up my tripod, I did what I haven’t done in a long time: I put my 18-55mm zoom lens on my D60 (Nicky). In retrospect, perhaps using Jane would not have been a bad idea, but in light of the aforementioned factors, Kitty’s flexibility was priceless last night. Also priceless was my wireless remote (Millie), which allowed me to avoid camera shake as a result of pressing the shutter button. It, along with Legs, also increased my photographer cred exponentially. :-)

If you haven’t noticed yet, I don’t have an astronomical amount of camera gear. I own one point-and-shoot, one DSLR body, three lenses (one zoom and two primes), one speedlight, two flash diffusers, one tripod and one wireless remote. Up to this point, my gear has served me well, regardless of how often it’s been used.

As far as I’m concerned, it’s not about having the most tools – just the right ones.

March 30, 2010

Money, Shot

I had the pleasure of photographing social media personality Crystal Gibson’s birthday party yesterday evening. It’s not easy to balance photography with eating and socializing, but it’s also not impossible. At one point, the guests started assembling for a group shot; under normal circumstances, this would be cause for excitement. However, due to my autofocus-disabled Nifty Fifty lens and an unfavourable lighting situation, my chances of shooting a good shot were slim.

Picture the situation: me, my camera gear and eleven people – including the birthday girl herself – expecting me to take the shot of my life. Since I was shooting in manual mode (as I usually do), getting the settings right was an absolute must.

After muttering what must have been the shortest prayer of my life thus far, I photographed my first attempt. The resulting shot was too dark and probably unfocused; when I let the guests know that, a few of them weren’t too pleased. Still, they were gracious enough to give me a second attempt, which was also darker than I would have liked. Fortunately, it was focused enough that TK would live to see another day; the guests also liked it.

Naturally, I still had to address the lighting situation in my outdated copy of Photoshop Elements 4.0 in order to produce this final result.

#CrystalTO #17

If I could do it all over again, I would have used my other lens. Then again, this little victory would not have been as sweet as it is.

March 02, 2010

You Only Get One Shot

As I’ve previously said, I enjoy shooting in manual mode. The satisfaction of shooting photographs without a safety net is indispensable. Having said that, certain situations require me to be more precise in adjusting my camera’s settings. Shooting strangers is a good example; they may not have the patience to pose multiple times while I tweak these settings to optimal values.

Consider Saturday night’s shoot at PFL 39. After the fights were over, I asked a few of the fighters to pose for photographs. I got a few good photos, but only after unfocused first attempts. In that regard, I must thank PFL Commissioner Stacey Case, Shady Godiva, Bobbi Pinn and TV Starr for their patience and understanding as I adjusted my focus for their second shots. I must also thank them (along with Dinah Mite) for letting me photograph them in the first place.

Furthermore, in the case of Case and Pinn, I forgot to turn on my flash for my first attempt at capturing them. On my second try, I got the shot I wanted, but it was a little bit dark when I reviewed it at home. Ergo, I tweaked the lighting a little bit in Photoshop Elements and ended up with this final product.

PFL 39 #35

Overall, this was a challenging but ridiculously fun shoot. I wouldn’t hesitate to shoot another Pillow Fight League event, if only to photograph fighters I didn’t see on Saturday (like Olivia Neutron-Bomb).

February 26, 2010

The Lines You Amend

Depending on the type of event I’m shooting, I’ll either move around for the sake of variety or stay in one place for the sake of courtesy. With a few exceptions, courtesy was my primary concern at yesterday’s Canada Reads event in the Toronto Reference Library’s Appel Salon. As a result, I didn’t move around too much; unfortunately, this approach can result in a monotonous set of photos.

I usually shoot photographs as close to a horizontal or vertical orientation as I can, especially when straight lines are involved. In other words, given the circumstances, I usually take photos like the one below. The lines aren’t perfectly straight, but that's not a big deal in this case.

Toronto Celebrates Canada Reads #10

As I said before, an album of similar photos would have been mundane, even with different people sitting in the chair. Fortunately, while Roland Pemberton (a.k.a. Cadence Weapon) was being interviewed by host Mary Ito, I got the notion to play with orientations. As a result, I started taking photos like this one.

Toronto Celebrates Canada Reads #17

In this example, thanks to my placement of Shakura S’Aida (the main subject), the lines lead your eyes directly to her body. Mind you, this would have been true if the lines were straight, but these slanted lines are more likely to grab your attention and “coerce” your vision. If I took this picture in a similar fashion to the previous one, it wouldn’t have been as interesting.

I enjoyed using this technique throughout the photo shoot, as you can see below in this photo of Mary Wiens.

Toronto Celebrates Canada Reads #26

Still moving onward and upward, learning as I go...

February 23, 2010

Caught By The Fuzz

As I’ve previously said, my 50mm lens doesn’t autofocus on my D60. This isn’t usually a stumbling block; even when my subjects are constantly moving, I manage to take a good number of decent shots.

Yesterday evening’s shoot at Fireside Culture Week’s opening night presented me with a different kind of challenge. Even though Lady Luck Productions’ performance involved moving subjects, it wasn’t nearly as tough to shoot as the concert by Najjah’s World. A few factors contributed to this predicament – namely, the dim lighting and Najjah’s movements. There was also one other factor at play, but I won’t explicitly mention it because some people may misinterpret what I’m saying.

The aforementioned factors led to my rangefinder being inaccurate, particularly when I was photographing Najjah himself. As a result, when I thought that my picture was in focus due to seeing the rangefinder’s dot, it actually wasn’t. I ended up taking quite a few fuzzy pictures, so I resorted to focusing through the viewfinder itself. I also used the backup singer, Ammoye, as a point of reference for my rangefinder.

Despite these challenges, I was able to get a few good shots of the concert using my newfound techniques – like this one.

FCW Opening Night #49

This photo’s f-stop is 3.2, which is on the wide end of the aperture spectrum. With low f-stop values, my focusing needs to be particularly precise. Mind you, I can work around this fact by raising my f-stop to a value which forgives inaccurate focusing.

Then again, the resulting reduction of light passing through the lens is another challenge to resolve...

February 02, 2010

The Fantastic Manual

I have a friend at my church who is an amateur photographer, like I am. A few months ago, he started reading Understanding Exposure by Bryan Peterson. While we were talking one day, he suggested that I start shooting in manual mode in order to improve my understanding of exposure; he got this tip from Bryan’s book. When I first heard this suggestion, I thought that it was a bit misguided. Surely I could take good photos by shooting in program auto (P), shutter speed (S) or aperture mode (A), right?

Yes, I can – but I’m starting to think that I can take better photos when I turn my camera’s dial to “M.” In P mode, the camera controls both the shutter speed and aperture, though I’m still able to generate different combinations. In S or A mode, I control the corresponding setting, but the camera controls the other one. Relinquishing control to the camera can work either for or against you, especially if the composition of a potential photo is constantly changing. In M mode, I can have more control of my photographs and feel a greater sense of accomplishment when I’m done.

Case in point: at the WinterCity shoots on the weekend, I was planning to shoot in aperture or shutter speed mode. My thinking was that either option would have been easier on my fingers in light of the cold weather, even though I had my new gloves on. If I shot in manual mode, it would have been necessary to simultaneously scroll the command wheel and press a button in order to change the aperture setting. Nonetheless, after finding out that my new glove setup worked very well, M mode was the only way to go.

Mind you, since my DSLR’s rangefinder doesn’t work in manual mode, shooting becomes a bit more difficult, especially with moving subjects. The only way I know I’m in focus is the appearance of a dot in the bottom-left corner of my viewfinder. Having said that, I’ve gone manual for my last few shoots and this has proven to be a minor obstacle.

Chalk up another milestone on my quest to take better photographs. Thanks for the tip, Brian (and Bryan).

December 04, 2009

Photography Rule #1

I should have learned my lesson after my first encounter with a "work interruption" from nature's call - but noooo...

I was photographing the Cavalcade Of Lights display in Yorkville yesterday night when I felt the need to pee. I initially thought that I'd be able to put off a trip to the washroom until this shoot was over, but my assumption was grossly incorrect. Ergo, I made my way to a nearby concourse and hatched a plan to prevent unintentional fertilization.

Unfortunately, this plan was hampered due to these relatively minor realities:
  • Since I had my tripod, I had to pack it before I could find a washroom.
  • My camera also needed to be packed.
Both tasks were made much harder due to the fact that at any given moment, I could have made like Avril Lavigne and let go. Fortunately, not only did I pack without any casualties, I also found a nearby washroom at Winners' Bloor Street location.

If you don't take any other piece of advice at this blog, please - for God's sake and yours - take this one. Consider it Photography Rule #1: don't drink too much liquid before a shoot.